In this step you’ll deploying a Sysdig serverless agent for Fargate using Terraform.
Follow the instructions below to recreate a complete production environment for Fargate.
Requisites
- Sysdig Secure account
- Terraform
Prepare the orchestrator and demo environment
Download the assets for this demo in your working station with:
mkdir fargate-serverless-agents/terraform-installer
cd fargate-serverless-agents
git clone https://github.com/aws-samples/aws-modernization-with-sysdig.git
cp aws-modernization-with-sysdig/static/code/fargate ./terraform-installer/
rm -rf aws-modernization-with-sysdig/
Here you can find a small description of the Terraform manifests available for this demo:
- main.tf: defines the AWS region used for this demo.
- network.tf: VPC and subnets required for Fargate.
- variables.tf: variables defined to customize the deployment with your Sysdig account’s credentials.
- orchestrator.tf: definition of the orchestrator agent.
- load.tf: sample application definition for Fargate. This application writes on /bin.
- instrumented_load.tf: instrumented version of load.tf (example of the final result).
Retrieve all the necessary data to deploy your orchestrator agent.
If you have not done it yet, configure your
aws-cliregion:export AWS_REGION=us-east-1 aws configure set default.region ${AWS_REGION} aws configure get default.regionGo to your Sysdig Secure dashboard (please note that this might vary depending on the region you used at registration) and get:
- Your Sysdig Agent Access Key, and Agent’s collector and port. Click on Install the Agent dropdown and get the values from there. Alternatively you can also get this information from your User Settings menu.
- Your Secure API Token
Once that you have this information, set the environmental variables with them (note that this values are an example, use your own).
AGENT_ACCESS_KEY=d5eff4k3-f4k3-f4k3-f4k3-f4k3f4k391f3
AGENT_COLLECTOR=collector-static.sysdigcloud.com
AGENT_PORT=6443
SECURE_API_TOKEN=17f4f4k3-f4k3-f4k3-f4k3-f4k317eaa84d
Instrument your Fargate task definition (load.tf).
Instrumenting an existing Fargate task
A sample instrumented_load.tf is provided with the final result. Remove the load.tf file with
rm load.tfif you are going to use the instrumented task definition in instrumented_load.tf.In your task definition, add the Sysdig Terraform Provider:
terraform {
  required_providers {
    sysdig = {
      source  = "sysdiglabs/sysdig"
      version = ">= 0.5.39"
    }
  }
}

provider "sysdig" {
  sysdig_secure_api_token = var.secure_api_token
}
Then, for the container definition, add the next fields and values:
workload_agent_image = "quay.io/sysdig/workload-agent:latest"

sysdig_access_key = var.access_key
orchestrator_host = module.fargate-orchestrator-agent.orchestrator_host
orchestrator_port = module.fargate-orchestrator-agent.orchestrator_port
You should have something similar to instrumented_load.tf
(remove this sample file after you check it)
with rm instrumented_load.tf.
Stack deployment
Now, you are ready to deploy the Fargate task along with the required elements to secure your workloads with the Sysdig Serverless Agent.
Deploy everything with:
terraform init && terraform apply \
  -var "prefix=training" \
  -var="region=us-east-1" \
  -var="access_key=$AGENT_ACCESS_KEY" \
  -var="collector_host=$AGENT_COLLECTOR" \
  -var="collector_port=$AGENT_PORT" \
  -var="secure_api_token=$SECURE_API_TOKEN" \
  -auto-approve
After the deployment is completed (2-3 minutes), you should see something like this in your terminal:
Initializing modules...
Downloading registry.terraform.io/sysdiglabs/fargate-orchestrator-agent/aws 0.1.1 for fargate-orchestrator-agent...
- fargate-orchestrator-agent in .terraform/modules/fargate-orchestrator-agent

Initializing the backend...

Initializing provider plugins...
- Finding latest version of hashicorp/aws...
- Finding latest version of hashicorp/template...
- Finding sysdiglabs/sysdig versions matching ">= 0.5.39"...
- Installing sysdiglabs/sysdig v0.5.40...
- Installed sysdiglabs/sysdig v0.5.40 (signed by a HashiCorp partner, key ID 0A2458C5D4F39147)
- Installing hashicorp/aws v4.35.0...
- Installed hashicorp/aws v4.35.0 (signed by HashiCorp)
- Installing hashicorp/template v2.2.0...
- Installed hashicorp/template v2.2.0 (signed by HashiCorp)

Partner and community providers are signed by their developers.
If you'd like to know more about provider signing, you can read about it here:
https://www.terraform.io/docs/cli/plugins/signing.html

Terraform has created a lock file .terraform.lock.hcl to record the provider
selections it made above. Include this file in your version control repository
so that Terraform can guarantee to make the same selections by default when
you run "terraform init" in the future.

Terraform has been successfully initialized!

(...)
(Creating resources...)

Apply complete! Resources: 28 added, 0 changed, 0 destroyed.

Outputs:

agent_orch_host = "tf-lb-20221019221952869600000009-dd490df9058629da.elb.us-east-1.amazonaws.com"
agent_orch_port = 6667
agentone_subnet_1 = "subnet-02749b86fd1d72bd3"
agentone_subnet_2 = "subnet-0f2a4877b8a47996c"
agentone_vpc = "vpc-030d18345999b0ac8"
The first security alerts will pop up in your Sysdig Secure Events feed right after the deployment is completed.
Visualize runtime security threads from Fargate in Sysdig Secure
This application has a basic behavior: writing under /bin.
Sysdig Secure includes by default a Falco Rule detecting this behavior.
Browse to Sysdig Secure > Events
Here you can find a feed with all the events that have ocurred during the last time period in your connected Fargate tasks (and other hosts).
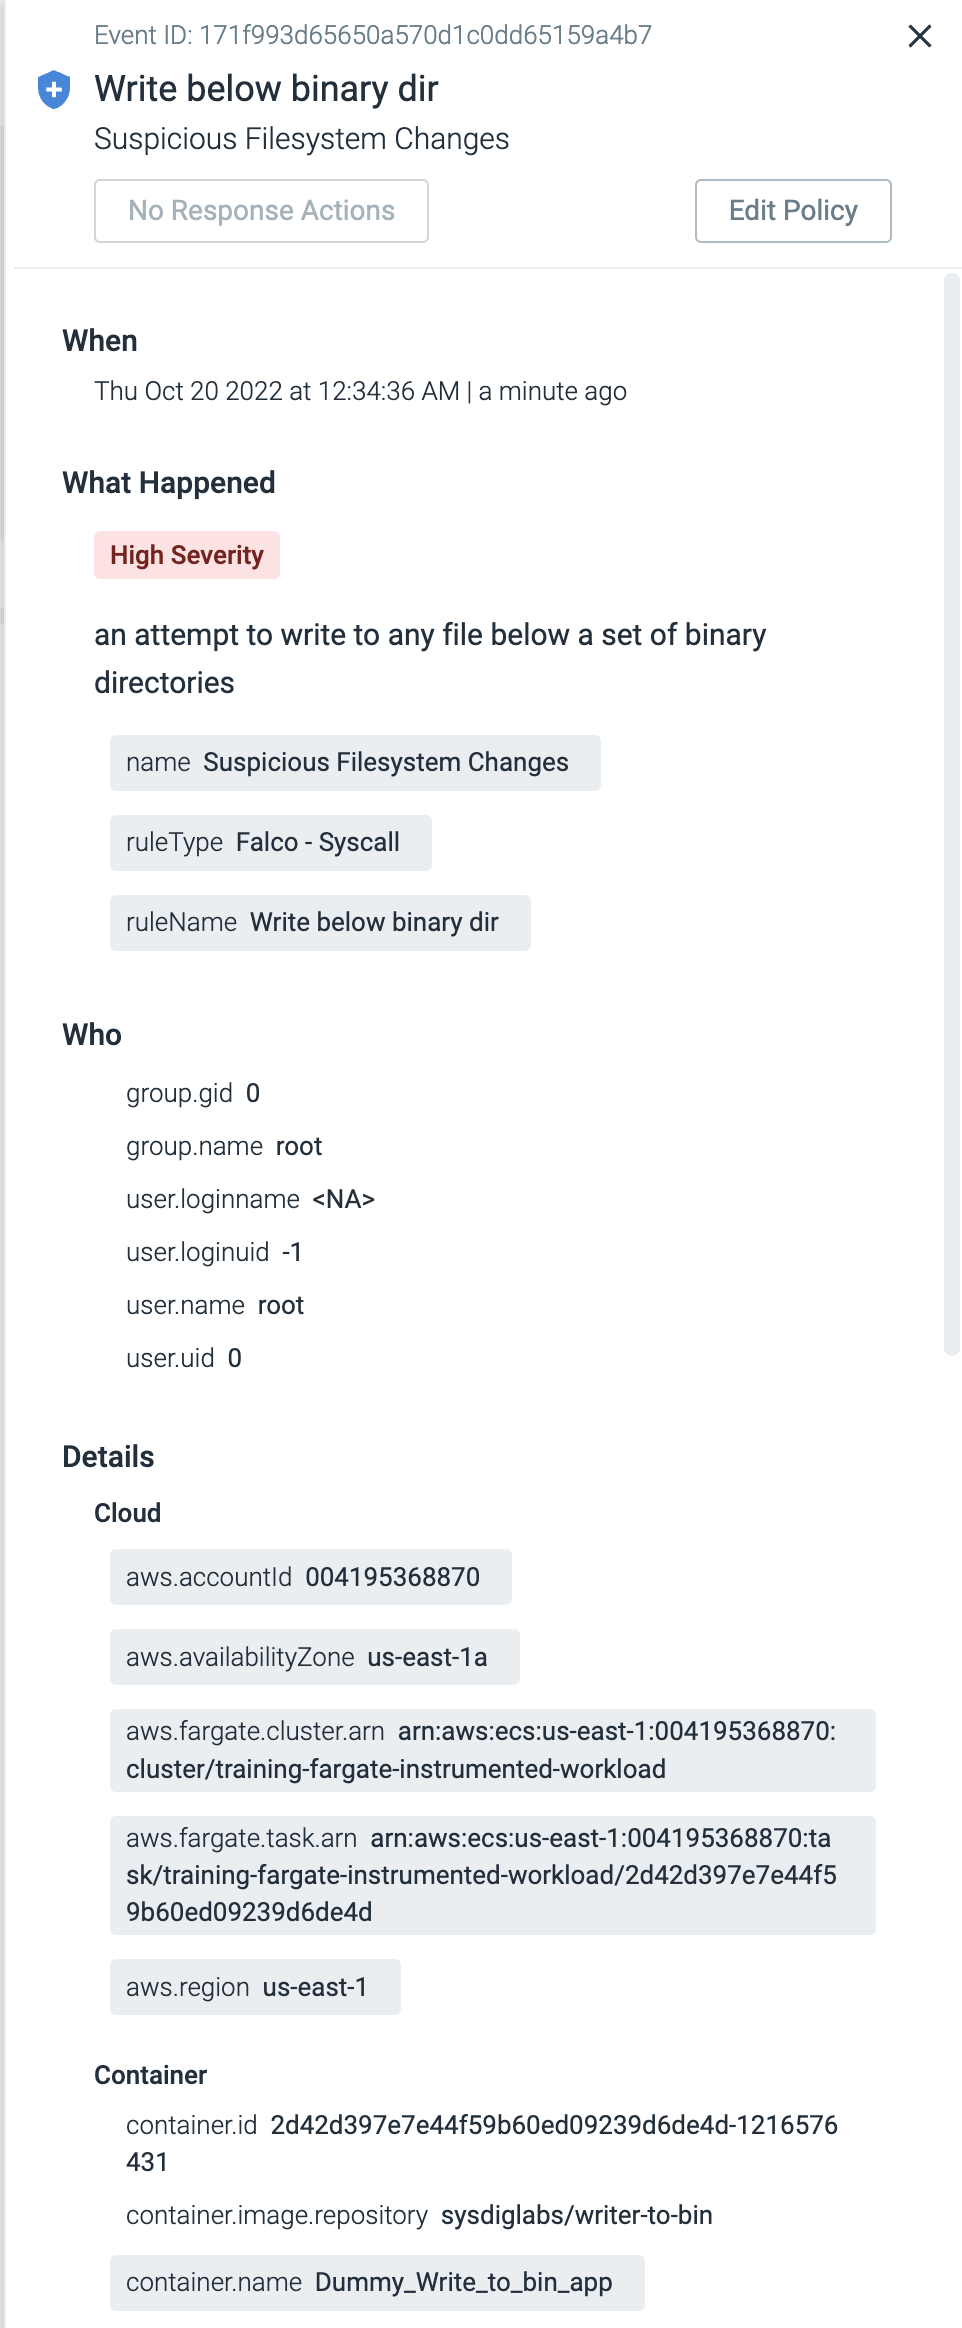
Select the triggered event and review in the lateral view all the information available.
From here you can visualize:
- The policy and rule that was triggered by the event
- The Fargate instance identifier
- AWS Region
- Container name
- and much more!
You have finished this practice.
During this section you replicated a production Fargate environment. You instrumented an existing Fargate task definition to detect runtime security threats with the Sysdig Serverless Agent.
Now you are ready to Detect Runtime security threads in your AWS Fargate workloads with Sysdig Secure.
Clean-up
To delete the resources created during this part of the training, execute:
terraform destroy \
  -var "prefix=training" \
  -var="region=us-east-1" \
  -var="access_key=$AGENT_ACCESS_KEY" \
  -var="collector_host=$AGENT_COLLECTOR" \
  -var="collector_port=$AGENT_PORT" \
  -var="secure_api_token=$SECURE_API_TOKEN" \
  -auto-approve
Then, wait 2-3 minutes for all the resources to be destroyed. These are the logs:
(...)
aws_vpc.vpc: Still destroying... [id=vpc-030d18345999b0ac8, 1m50s elapsed]
aws_vpc.vpc: Still destroying... [id=vpc-030d18345999b0ac8, 2m0s elapsed]
aws_vpc.vpc: Still destroying... [id=vpc-030d18345999b0ac8, 2m10s elapsed]
aws_vpc.vpc: Still destroying... [id=vpc-030d18345999b0ac8, 2m20s elapsed]
aws_vpc.vpc: Still destroying... [id=vpc-030d18345999b0ac8, 2m30s elapsed]
aws_vpc.vpc: Destruction complete after 2m39s

Destroy complete! Resources: 28 destroyed.